
If your company is looking to purchase banner advertising on other websites in order to draw more traffic, this post will show you how to track the clicks on those banners so that they show up properly in your Google Analytics reports.
First, what is a banner ad? A banner ad is a graphic that is placed on a website that if clicked, will lead visitors from that site to your site. You may be charged a flat rate per month based on position, or you may pay under a cost per thousand impressions (CPM) model. Each website will have their own precise specs on banner ad sizes, but common sizes include 728×90 (leaderboard), 300×250 (medium rectangle), 250×250 (square), 160×600 (wide skyscraper), 468×60 (full banner), and 125×125 (square button). Your banner ads can be animated .gif’s or just static graphics. Each publishing website will have their own limitations on file size as well, but it is common to keep an animated .gif at 70kb or less, and a static banner at 30kb or less. The publisher wants to ensure that the ads will not adversely affect their page load times. The proper method to track these banners in Google Analytics involves “tagging” the destination URL and adding parameters to the URL that Google Analytics understands how to interpret, and then appropriately bucket in your reports.
What is “tagging” a URL mean?
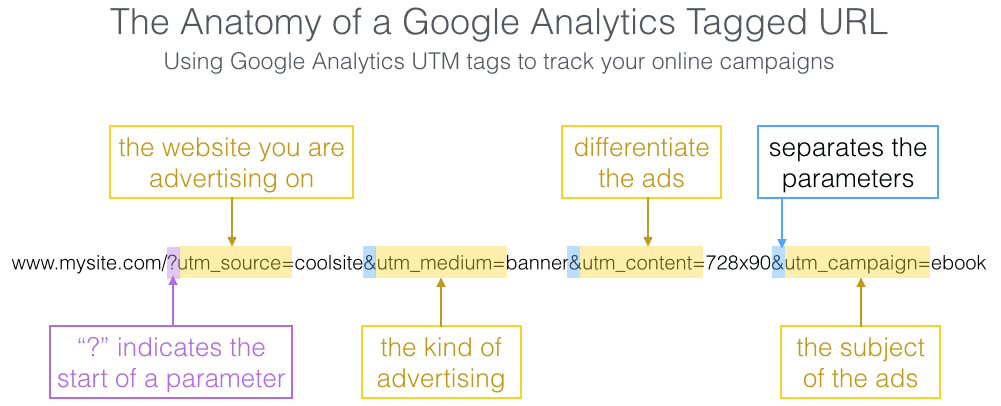
Instead of telling your publisher to link your ads to “www.mysite.com”, you would give them something like this:
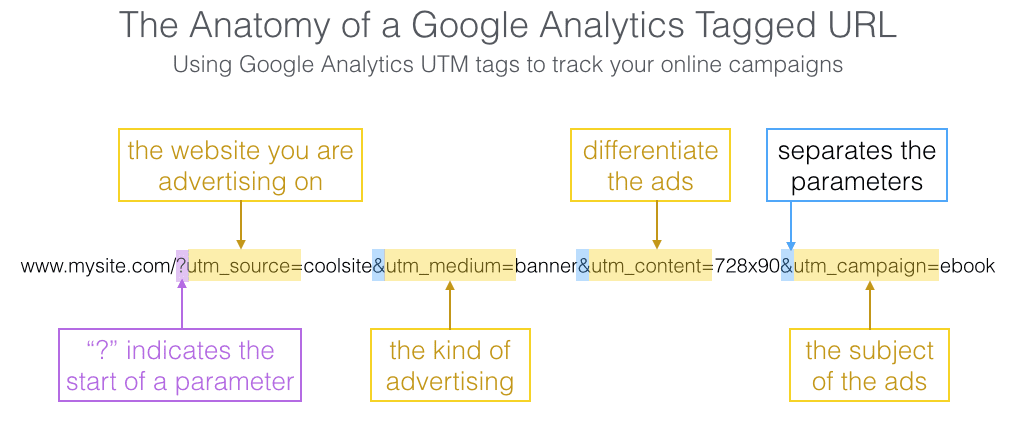
Google Analytics can now interpret this link and put the traffic in the correct place in your reports. There are 4 primary tags you will use in your URLs: 1) Source (the website you have the banner on); 2) Medium (the type of ad; i.e. banner, cpc, email, etc.); 3) Content (whatever could be used to differentiate ads, such as size, or static vs animated); 4) Campaign (the product, promo or content, such as ebook, webinar, etc.)
If you want to get really granular, you could do parameters such as “728×90-static” or “728×90-animated” to provide even more information per URL string.
Why do I need to tag my URLs?
Let’s say for example, that you would like to run 2 different banners on your favorite website, and test two different content offers. One banner you would like to be on the homepage in the leaderboard position, and it will offer a free ebook. The second banner you would like on a post page as a square button in the sidebar, and it is promoting your free webinar next month. If you did not tag your URLs, each click would show up in Google Analytics as a referrer source, and not a campaign.
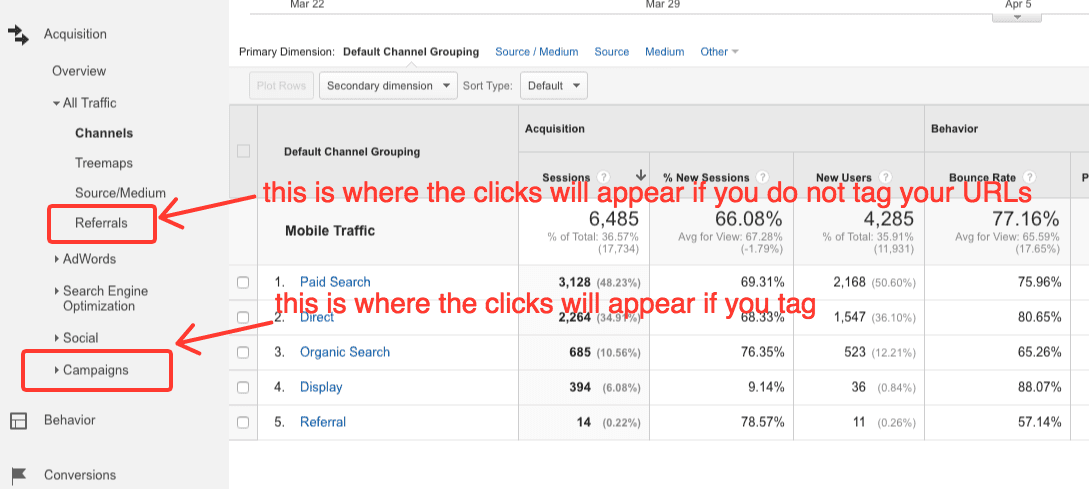
The benefit of tagging your URLs for each banner is that you can easily compare the effectiveness of each banner, or each campaign easier and more effectively. By going to the Campaigns tab in the Acquisition report, you can see all of your cost-per-click channels together. This would be much easier that having to cross-reference data in the Referral tab.
How do I tag my URL’s then?
Google provides us with an easy-to-use URL builder where we can enter the values for the banner and the specific campaign, and instantly generate the required URL. Then, provide this new and improved URL to your advertiser. Keep in mind that the extra information in the URL has no affect on the user and does not change the appearance of a page, and does not redirect the visitor. This exercise is simply adding more information to the URL so that when Google Analytics parses it, you will be able to get more insightful reporting.

Note: The Campaign Term field is reserved specifically for auto-tagging Google AdWords campaigns, and is generally not used for external advertising outside of AdWords (although it will not break anything if you do happen to use it).